Twin Buttes Topographic Map
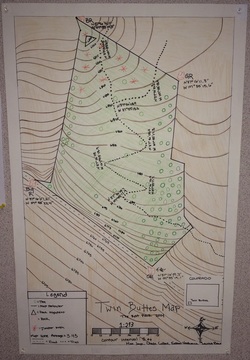
To measure our bearings and paces we used our GPS’s and compasses. To measure out the paces we counted our steps from rock to rock. Bearings directly translated on to our map to measure the angles from point to point and we converted footsteps to 1 step equaling 2.5 mm. We used the elevation tool on Google Earth to show us how to lay the contour lines. Contour lines are split by a certain amount of elevation to show the steepness of areas on the map. Someone hiking or biking in our mapped area could use the contour lines to determine where to go and what is safe. Doing this map project opened our eyes to the space we were mapping. It showed us the relationship and space between the rocks, bearings, trees and showed us how different things look on a map compared to real life.
Rube Goldberg:
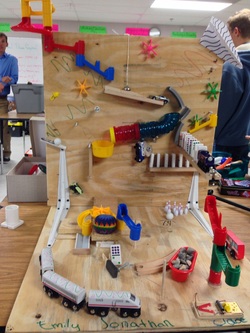
In this project, we put our creativity and our building skills to the test as we constructed a Rube Goldberg Machine. Designed to make a simple task complicated, we learned about the different calculations of force, velocity and more.
Rocket Project!!!
Rocket Reflection
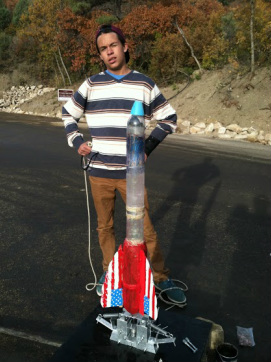
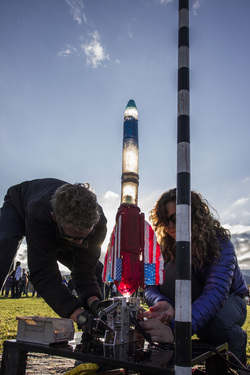
For weeks our physics class has been excitedly talking about the rocket project. Our rockets took about 1 week to plan and 2 weeks to construct. The rockets consisted of large water bottles molded together to create small chambers that were soon going to be filled with water and CO2. In our small groups of 2 or 3 we started creating a plan for how the structure of our rocket would look. Our plan was to create a base of two 2-liter bottles put together to create a large chamber with three wings. We used half of a smart water bottle for the base with another 2 water bottles on top of the base, with a nose cone and a parachute. My group and I started constructing our rocket after we developed a good strong plan. Our rocket took about 2 ½ weeks to build including decorating and test fires. Once our rocket was finished we had an exhibition where we fired our rockets and collected the data.
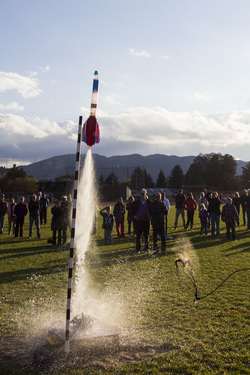
During exhibition our rocket flew 186.592m. The Exhibition launch was not our best flight. When our rocket was on the launch pad it sprung a leak in the epoxy creating a malfunction in the way the rocket flew. When the rocket landed it broke. Our rocket had at least 3 leaks, a cracked nose cone, dented chamber, and a loose wing. Since our rocket broke it didn’t fly as well as it did previously. If I could redo this project I would create a lighter weight rocket with wings that were not made of Plexiglas. The Plexiglas wings were too heavy and created a drag during the flights. Overall, I think this project helped me to understand the laws of motion and the concepts of aerodynamics. In conclusion this lab was very fun and worthwhile!
Data Table |
|
Rocket Log:
Entry 1: Today our group worked on collecting empty 2 liter bottles and empty smart water bottles. We cut them so that we could connect them together creating a large chamber.
Entry 2: Our group finished cutting and sanding the bottles we were going to connect. We epoxied the bottles together so that they had a strong firm bind.
Entry 3: Our group made two different chambers and connected them to that there was a long body with two different chambers on either end. We designed our wings and began to cut them.
Entry 4: Today we glued our wings to the larger body and created a parachute and connected the nose cone to the top of the rocket. We did a few test firings and our rocket ended up breaking.
Entry 5: We worked on collecting the pieces that we needed to fix our rocket.
Entry 6: We finished piecing out rocket together and connecting our parachute and puffy painted our wings.
Entry 7: Today we did test launches to see how well our rocket flew.
Entry 8: Today we did a second layer on the painting and we finished painting the body.
Entry 9: Today we put finishing touches on our rocket to make sure that it was perfect for flight.
Entry 10: Today we had our rocket exhibition and got to show off all the hard work we did on our rocket for the past few weeks.
Conclusion
After all the fun and excitement of constructing and flying our rockets the harder work began. We started crunching numbers and collecting data. We were trying to find how fast our rocket traveled while going up and down. The data collection team collected the time and angle of each rocket. Our rocket flew at 56.873m and created an angle of 47o. After we got the max height we started to calculate the actual velocity by V=D/T(velocity=distance/time) our velocity was 25.6m/s. We then used the equation T=square root of 56.873/4.9 and got 6.813s for our theoretical hang time. This project was a very fun and educational project that I will not forget!
After all the fun and excitement of constructing and flying our rockets the harder work began. We started crunching numbers and collecting data. We were trying to find how fast our rocket traveled while going up and down. The data collection team collected the time and angle of each rocket. Our rocket flew at 56.873m and created an angle of 47o. After we got the max height we started to calculate the actual velocity by V=D/T(velocity=distance/time) our velocity was 25.6m/s. We then used the equation T=square root of 56.873/4.9 and got 6.813s for our theoretical hang time. This project was a very fun and educational project that I will not forget!
